Product & Industrial Design
Our suggestion on the steps to design the product features, specs and industrial design follow. Seal is certainly in a position to help you develop your new projects or re-design current products and implement these steps on behalf of clients by meeting in person and teleconferencing with you and your sales & marketing and technical people each step of the way. Seal's western-educated designers live & work in China. These designers are then able to have close cooperation with local engineers and tool makers. They have extensive experience in working with the local manufacturers, the overseas client designers and understand the realities of fitting the electronics inside the designed housings. Seal's industrial designers recognize the need for an attractive design but at the same time are fully aware of the tooling and manufacturing costs in Asia so they are capable of making more informed balanced discussion with the client so the client can make a balanced decision. Examples: When a certain design feature is valuable and when it's just not worth the extra cost; when you're on budget restrictions, or all you need is a box, we can also offer you our team of experienced local designers working under western management (this team has millions of sold products to its name).
1. Problem Assessment
First, we write down what the problem(s) are first. Don't write down the solution to the problem at this point, even if you know how to do so. You simply need to state what the problem is and nothing more. Often our clients say the problem is more than just one problem. Examples: The current product cost too much or is too slow or does not operate smoothly or the product looks old-fashioned.
2. Design Specification
This is the step in which a solution to the previously defined problem(s) begins to form. At this point, a list of requirements of everything you can think of should be written down in an objective way, if at all possible. You are not coming up with a solution just yet; only setting the requirements necessary to create the product. Some examples of what should be on your list include, a retail price (how much are people willing to pay for this), size of the object (does it need to fit into someone's hand or through a door or in a garage), how fast should it go, does it need to be water proof, what should it be made of, does it use batteries or plug into the wall. This list can go on and on but the important thing is that you list what is important to you and your own clients. This list will help you and our designer and product development supervisors in the next step.
3. Idea Generation
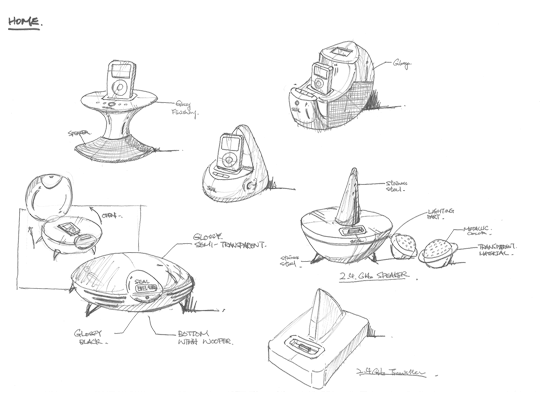
Now the problem has been defined and requirements have been set. At this point, we brainstorm and sketch out your ideas. At this point, we are trying to see if the concepts could work or if there is an obvious flaw. We will want to come up with basic renderings before moving to the next step such as these examples below.

4. Concept Design
Our first task is to sketch several concepts (see sketch examples above). Once the client agrees on one concept sketch, we will then proceed to 3D modeling of the selected sketch. The designer will come up with a basic 3D design on a computer that is detailed enough to be sure the idea will work; but not so detailed that it takes more than just a few hours to complete. This is the last step where an idea is either given the green light to move towards a commercial proposal or not.
5. Quotation proposal
Once the concept design, key features, etc. are confirmed, Seal will then provide a primary quotation for the development of the project such as mold cost, hardware engineering, firmware, safety as required by governmental testing (e.g. UL, FCC, CE, DHHS, FDA, ASTM), Licenses (e.g. Mpeg, Sisvel, PDF-DRM, Apple MFI), the product development schedules (PDS) and unit cost. By having all of this information the client can make a well informed commercial decision to go ahead with the proposal.
6. Detailed Design
Now that a solid concept design has been created and the proposal has been accepted by the client, it's time to get down to the details. In this phase, the designer will create full- detailed 3D virtual models of all parts, work out design problems, create assembly and part drawings for every part; and we find suppliers for all purchased components and create 3D physical prototypes if necessary. This phase is complete when all problems have been solved and a full set of drawings have been delivered.
7. Testing and pre-shipment/sales activities
As designs and specs have been accepted as part of the proposal at this stage, we now proceed with mold, hardware and firmware development (as needed). From these efforts we are able to create pre-production off tool samples which can then be used for safety, environmental, durability and other sorts of testing and critical pre-sales marketing campaign by the client in the form of pre-production sales samples. Testing is a very important part of product design and should not be overlooked. This step can be as simple as having a few people use the product for feed back or as complicated as sending it to a testing laboratory such as UL or SGS, ITS, and BV for a thorough testing by professionals. The level of testing will most likely be determined by requirements of the product industry and sales channel.
8. Manufacturing and QC
The final step in the design process is manufacturing. In this step we will find suitable manufacturing facilities to create the product that meet the specifications, cost and output required. This area is further covered in the Product Development Management and Manufacturing Qualification & Selection pages of this website.
